1. Creating Alibaba Cloud IoT Products and Devices
Currently, Alibaba Cloud offers 1 million free data usage each month, allowing users to utilize both the basic and premium versions without any cost after activation.
Alibaba Cloud IoT platform address: https://iot.console.aliyun.com/product
After logging in and activation, proceed to create test products and devices.
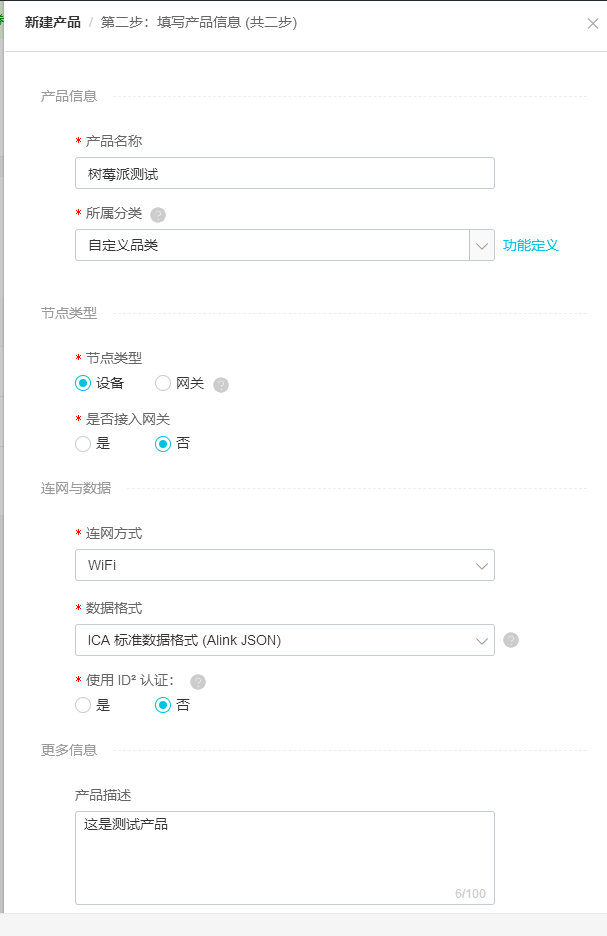
Creating a Product
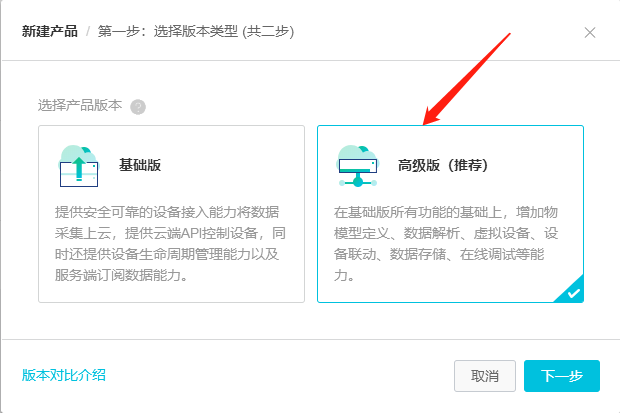
A product is defined as a class of hardware, with identical functions and appearances. Therefore, after adding a product, we can add thousands of devices under this category.
The information below must select a device that is not a gateway, the reason will be explained later.
.
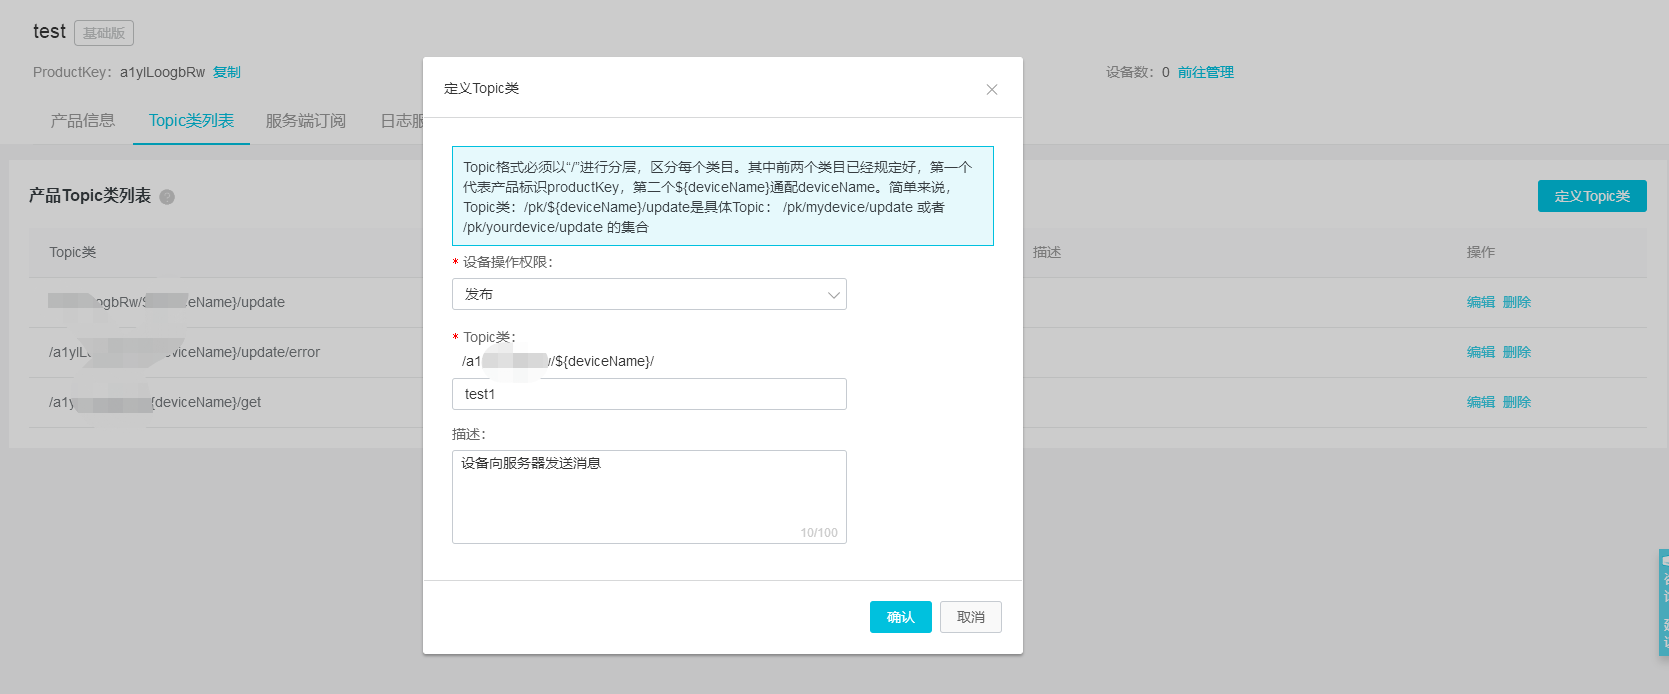
Set Up a Product
After creating a product, you need to define its features, what functionalities does it have? What types of communication can it perform?
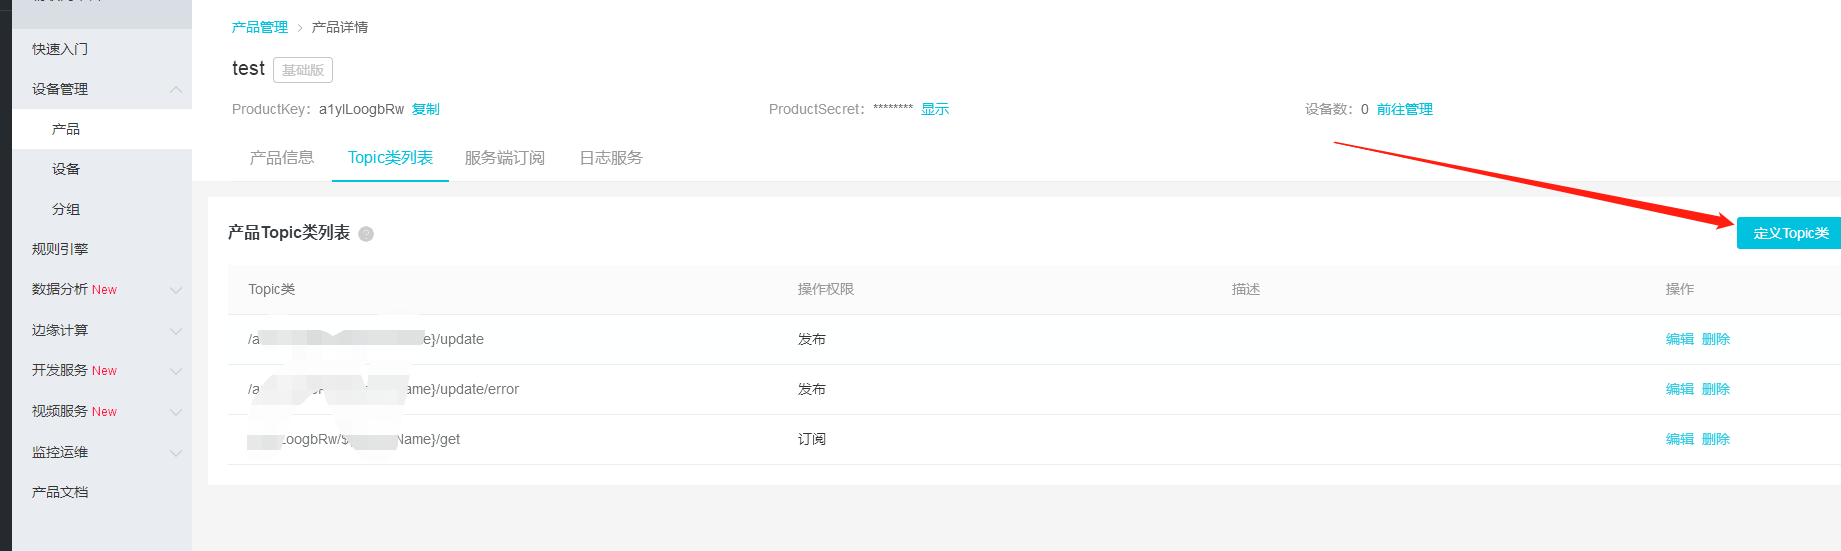
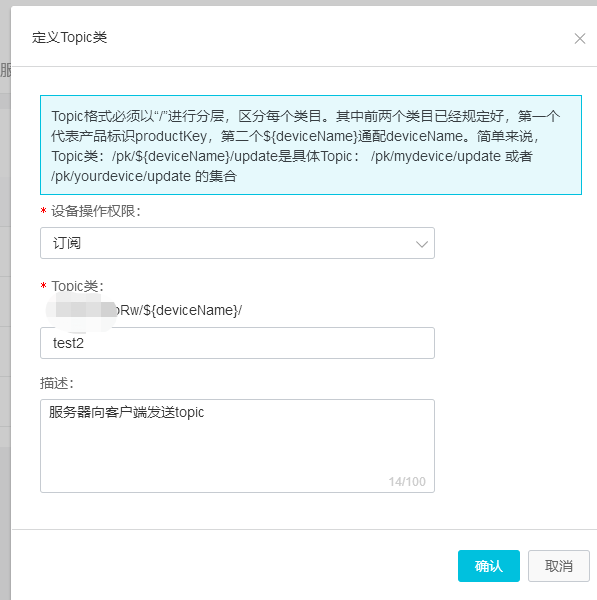
Define two topics, one for publishing and one for subscribing.
Named test1 and test2
Add a Device, Note Down Your Device Name and Other Information

Second, Download the SDK and Create a Project
SDK Download Link https://iot-demos.oss-cn-shanghai.aliyuncs.com/h2/iotx-as-http2-net-sdk.dll?spm=a2c4g.11186623.2.10.57e64c07SGupEH&file=iotx-as-http2-net-sdk.dll
Create a New .NET Framework 4 Console Project, Name it AlyIotIest
Add References and Include the Downloaded DLL
Create a New Class BackMessage.cs
Copy the Following Code into BackMessage (clear previous code), do not worry about why for now
using iotxashttp2netsdk.iot.auth.common; using iotxashttp2netsdk.iot.callback; using System; using System.Collections.Generic; using System.Text; namespace AlyIotIest { public class DefaultCallback : IHttp2MessageCallback { public ConsumeAction Consume(Http2ConsumeMessage http2ConsumeMessage) {Console.WriteLine(</span><span style="color: #800000;">"</span><span style="color: #800000;">Default Callback</span><span style="color: #800000;">"</span><span style="color: #000000;">); Console.WriteLine(http2ConsumeMessage.MessageId); </span><span style="color: #0000ff;">if</span> (http2ConsumeMessage.Payload.Length != <span style="color: #800080;">0</span><span style="color: #000000;">) { Console.WriteLine(</span><span style="color: #800000;">"</span><span style="color: #800000;">Received Message from Platform:</span><span style="color: #800000;">"</span><span style="color: #000000;">); </span><span style="color: #0000ff;">string</span> a =<span style="color: #000000;"> Encoding.ASCII.GetString(http2ConsumeMessage.Payload); Console.WriteLine(a); } </span><span style="color: #0000ff;">return</span><span style="color: #000000;"> ConsumeAction.CommitSuccess; } } </span><span style="color: #0000ff;">public</span> <span style="color: #0000ff;">class</span><span style="color: #000000;"> CustomCallback : IHttp2MessageCallback { </span><span style="color: #0000ff;">public</span><span style="color: #000000;"> ConsumeAction Consume(Http2ConsumeMessage http2ConsumeMessage) { Console.WriteLine(</span><span style="color: #800000;">"</span><span style="color: #800000;">Custom Callback</span><span style="color: #800000;">"</span><span style="color: #000000;">); Console.WriteLine(http2ConsumeMessage.MessageId); </span><span style="color: #0000ff;">if</span> (http2ConsumeMessage.Payload.Length != <span style="color: #800080;">0</span><span style="color: #000000;">) { Console.WriteLine(</span><span style="color: #800000;">"</span><span style="color: #800000;">Received Message from Platform:</span><span style="color: #800000;">"</span><span style="color: #000000;">); </span><span style="color: #0000ff;">string</span> a =<span style="color: #000000;"> Encoding.ASCII.GetString(http2ConsumeMessage.Payload); Console.WriteLine(a); } </span><span style="color: #0000ff;">return</span><span style="color: #000000;"> ConsumeAction.CommitSuccess; } }}
Third, Start Operation and Preparation Work
1. The Program.cs needs the following namespaces
using System;
using iotxashttp2netsdk.iot.auth.common;
using iotxashttp2netsdk.iot.message;
using System.Net;
using System.Linq;
using System.Text;
2. Set Up a Device Client Object
Copy static MessageClient client; into the Program class
    class Program
    {
        //  Step 1 Define Device Client #
        static MessageClient client;

...
...
}
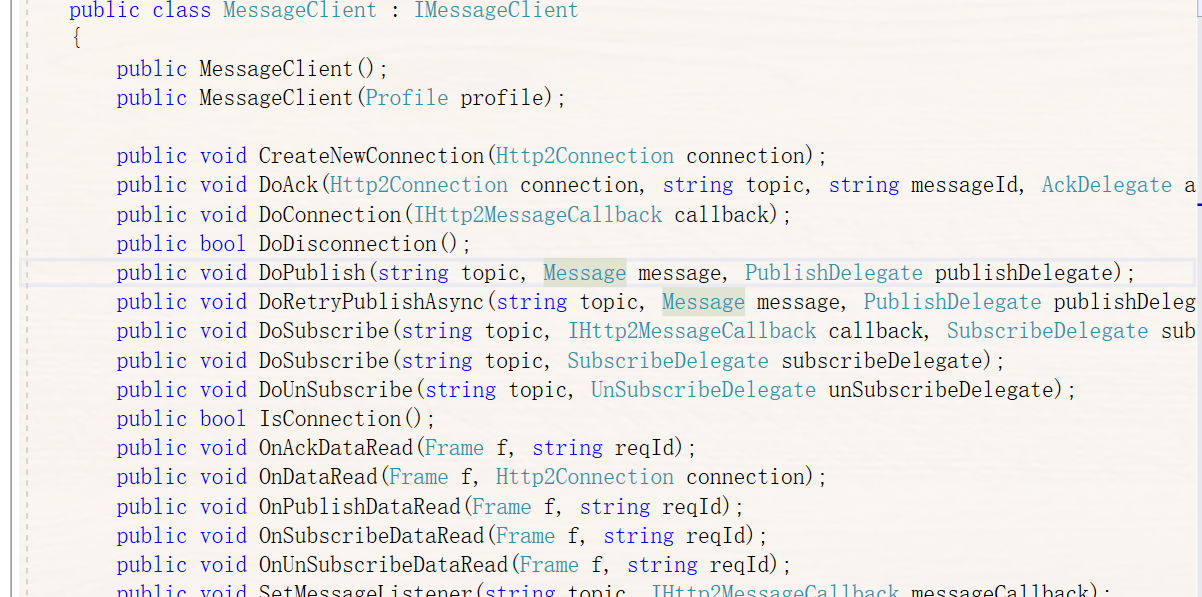
MessageClient is the core component used for connecting to the server, communications, subscribing and publishing topics, and triggering tasks, let's set it aside for now.
Fourth, Begin Writing Code
Write code in the Main method
Step 2, Add Key Information, fill in your keys in the appropriate places
       // Step 2 Get productKey, deviceName, deviceSecret information from console #
            // Find this information in the Alibaba Cloud IoT backend after setting up the product and adding the device
            string productKey = "   ";
            string deviceName = "   i";
            string deviceSecret = "   ";
Step 3
 // Step 3 Mark the Device Unique Identifier clientId
            // The example provided by Alibaba Cloud is the subnet IP
            IPHostEntry host = Dns.GetHostEntry(Dns.GetHostName());
            // Unique identifier for client device
            string clientId = host.AddressList.FirstOrDefault(
                ip => ip.AddressFamily == System.Net.Sockets.AddressFamily.InterNetwork).ToString();
// Region availability, modify as necessary
            string regionId = "cn-shanghai";
            string domain = ".aliyuncs.com";
            string endpoint = "https://" + productKey + ".iot-as-http2." + regionId + domain;
Step 4
            // Set up configuration service and build client
            // Connection service configuration items
            Profile profile = new Profile();
            profile.ProductKey = productKey;
            profile.DeviceName = deviceName;
            profile.DeviceSecret = deviceSecret;
            profile.Url = endpoint;
            profile.ClientId = clientId;
            // Clear accumulated messages
            profile.CleanSession = true;
            // For messages with qos>0, set retries in case of SDK exceptions, maximum of 3 retries
            profile.RetryPubCount = 3;
            // Retry interval time in seconds
            profile.RetryIntervalTime = 2
            profile.GetDeviceAuthParams();

            // Construct the client
            client = new MessageClient(profile);
Step 5
         // Set the subscription and publication topic
            string topic = "/" + productKey + "/" + deviceName + "/user/test1";
            string topic2 = "/" + productKey + "/" + deviceName + "/user/test2";
            // Receive data, effective only once upon connection
            // Default callback
            client.DoConnection(new DefaultCallback());

            // Callback
            // Custom IHttp2MessageCallback to be used for every message received
            client.SetMessageListener(topic2, new CustomCallback());

            client.DoSubscribe((string)topic, msg =>
            {
                Console.WriteLine ("Subscribed to server message");
                Console.WriteLine("msg.Code: " + msg.Code);
                Console.WriteLine("topic: " + msg.Message.Topic);
                Console.WriteLine(msg.Message);
                Console.WriteLine("body: " + Encoding.ASCII.GetString(msg.Body));
                Console.WriteLine(msg.Message.MessageId);
            });
            client.DoSubscribe((string)topic2, msg =>
            {
                Console.WriteLine ("Subscribed to server message");
                Console.WriteLine("msg.Code: " + msg.Code);
                Console.WriteLine("topic: " + msg.Message.Topic);
                Console.WriteLine(msg.Message);
                Console.WriteLine("body: " + Encoding.ASCII.GetString(msg.Body));
                Console.WriteLine(msg.Message.MessageId);
            });
Step 6
Add a method
public static void SendData(string topic, string str)
        {
            // Send message
            Message message = new Message();
            message.Payload = Encoding.ASCII.GetBytes(str);
            message.Qos = 1;
            client.DoPublish(topic, message, msg =>
            {
                Console.WriteLine("Publish topic message, messageId: " + msg.Message.MessageId
                                  + " || topic: " + msg.Message.Topic
                                  + " || code: " + msg.Code
                                  + " || body: " + Encoding.ASCII.GetString(msg.Body));
            });
        }
In the Main method, add the following:
            while (true)
            {
                Console.WriteLine("Input data");
                string str = Console.ReadLine();
                if (str.ToUpper() == "EXIT")
                {
                    break;
                }
                SendData("/" + productKey + "/" + deviceName + "/user/test1", str);
            }

            Console.ReadKey();
Run your project
V. Run Test
```

文章评论