1. Quick Implementation of Authorization Verification
What is JWT? Why use JWT? What are the components of JWT?
These can be easily found on Baidu, so I won't elaborate here.
In fact, it's sufficient to know that the JWT authentication mode uses a Token as the basis for authentication.
Let's look at the location for setting the Token in Postman.
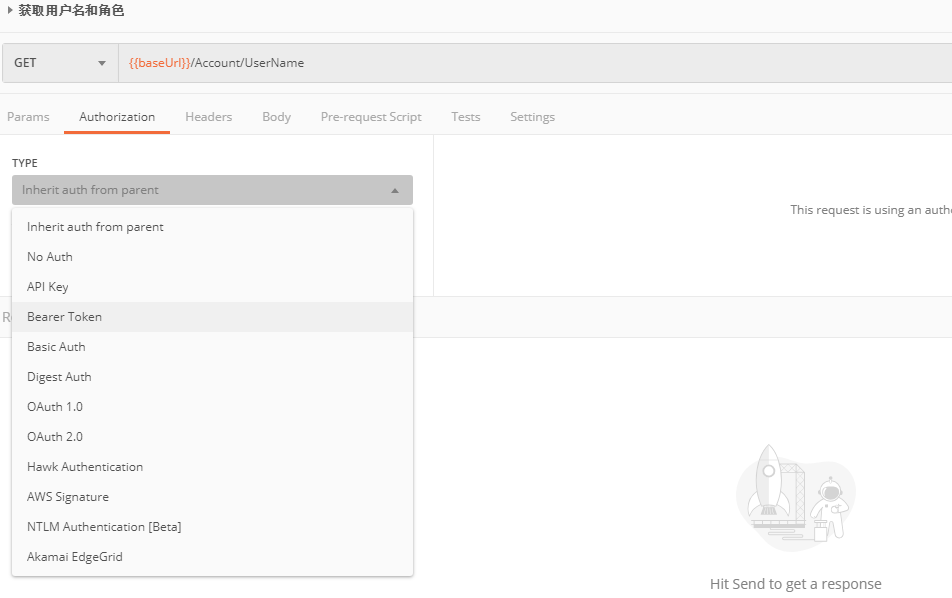
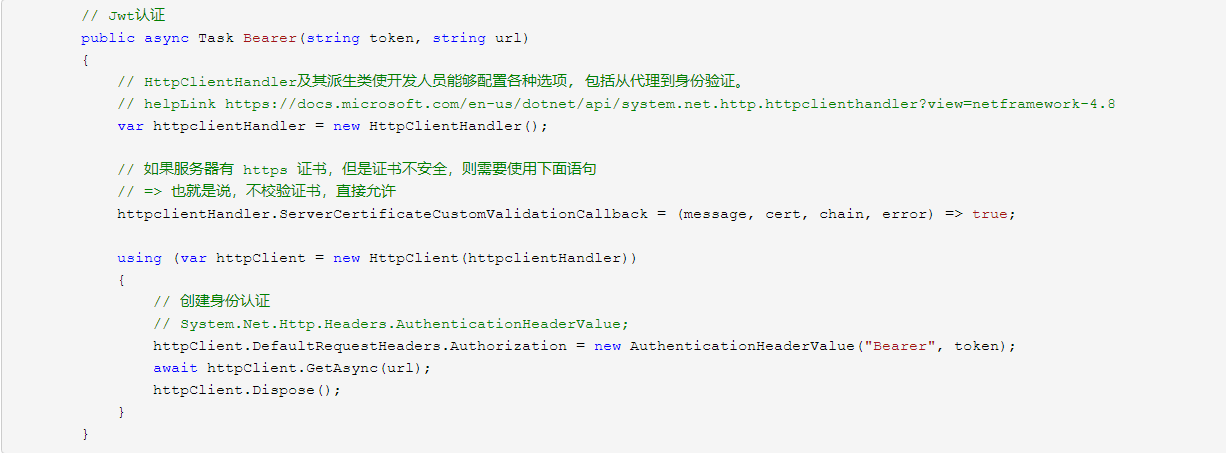
So, how do we use C#'s HttpClient to access a JWT-authenticated Web API?
Next, let's create an ASP.NET Core project and try to add JWT authentication functionality.
1.1 Adding JWT Service Configuration
In the ConfigureServices method of Startup.cs, add a service:
            // Set the authentication method to Bearer Token
            // You can also add using Microsoft.AspNetCore.Authentication.JwtBearer;
            // Use JwtBearerDefaults.AuthenticationScheme instead of the string "Bearer"
            services.AddAuthentication("Bearer")
                .AddJwtBearer(options =>
                {
                    options.TokenValidationParameters = new TokenValidationParameters
                    {
                        ValidateIssuerSigningKey = true,
                        IssuerSigningKey = new SymmetricSecurityKey(Encoding.UTF8.GetBytes("abcdABCD1234abcdABCD1234")),    // The key for encrypting and decrypting the Token

                        // Should the issuer be validated?
                        ValidateIssuer = true,
                        // Issuer name
                        ValidIssuer = "server",

                        // Should the audience be validated?
                        // Audience name
                        ValidateAudience = true,
                        ValidAudience = "client007",

                        // Should the token validity duration be validated?
                        ValidateLifetime = true,
                        // Valid duration of the token for each issuance
                        ClockSkew = TimeSpan.FromMinutes(120)
                    };
                });
Modify the middleware in Configure:
            app.UseHttpsRedirection();

            app.UseRouting();

            app.UseAuthentication();		// Note here
            app.UseAuthorization();
It's that simple. With these settings, requests will require permission verification.
1.2 Issuing a Token
The issued Token will not be saved by ASP.NET Core.
Once ASP.NET Core has enabled Token authentication, you can place the code for generating the Token in different console applications. As long as the key, Issuer, and Audience remain consistent, the generated Token can log into this ASP.NET Core application.
That is to say, you can create console applications at will to generate Tokens, and the generated Tokens can successfully log into the ASP.NET Core program.
As for why, we'll discuss that later.
In Program.cs, add a method like this:
        static void ConsoleToke()
        {

            // Define user information
            var claims = new Claim[]
            {
                new Claim(ClaimTypes.Name, "痴者工良"),
                new Claim(JwtRegisteredClaimNames.Email, "66666666666@qq.com"),
            };

            // Consistent with the configuration in Startup
            SymmetricSecurityKey key = new SymmetricSecurityKey(Encoding.UTF8.GetBytes("abcdABCD1234abcdABCD1234"));

            JwtSecurityToken token = new JwtSecurityToken(
                issuer: "server",
                audience: "client007",
                claims: claims,
                notBefore: DateTime.Now,
                expires: DateTime.Now.AddMinutes(30),
                signingCredentials: new SigningCredentials(key, SecurityAlgorithms.HmacSha256)
            );

            string jwtToken = new JwtSecurityTokenHandler().WriteToken(token);
            Console.WriteLine(jwtToken);
        }
Call this method in Main():
        public static void Main(string[] args)
        {
            ConsoleToke();
            CreateHostBuilder(args).Build().Run();
        }
1.3 Adding API Access
We will add an API.
The [Authorize] attribute is used to indicate that this Controller or Action requires a compliant Token for login.
    [Authorize]
    [Route("api/[controller]")]
    [ApiController]
    public class HomeController : ControllerBase
    {
        public string Get()
        {
            Console.WriteLine(User.Claims.FirstOrDefault(x => x.Type == ClaimTypes.Name));
            return "Access Successful";
        }
    }
Then start ASP.NET Core and test access to https://localhost/api/home in Postman.
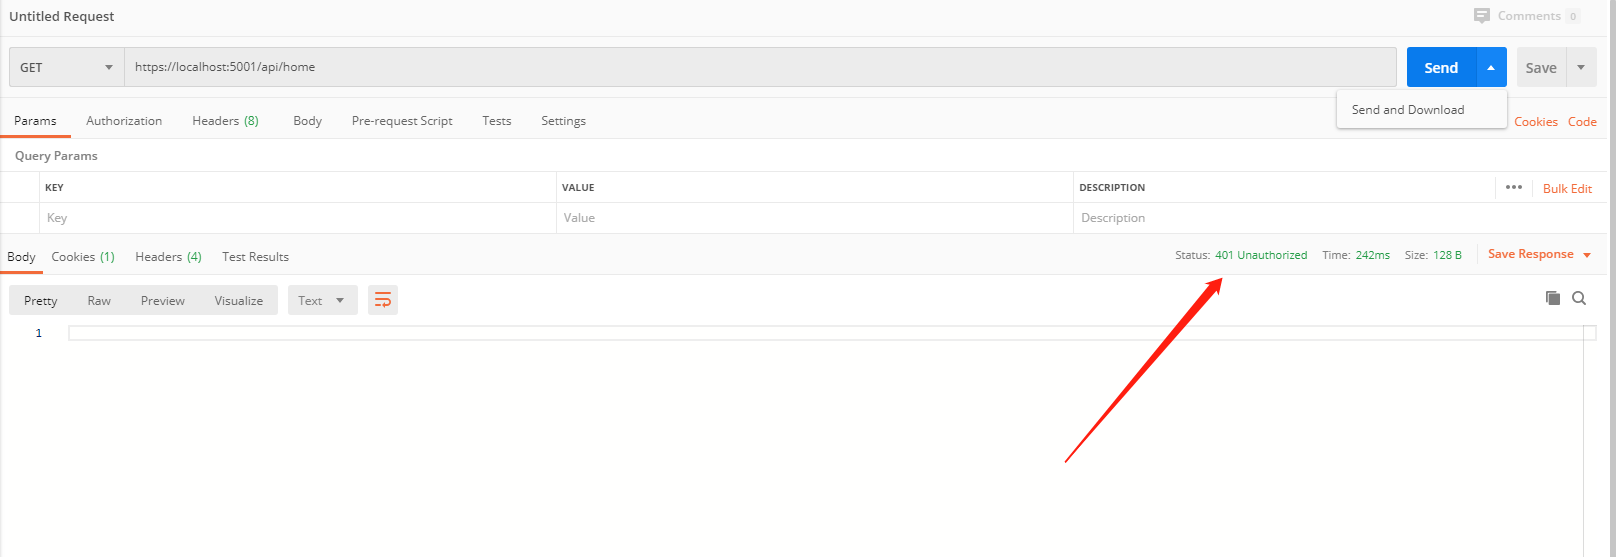
An HTTP 401 (Unauthorized) status code is returned, which is because the request did not carry a Token, leading to an inability to access the API.
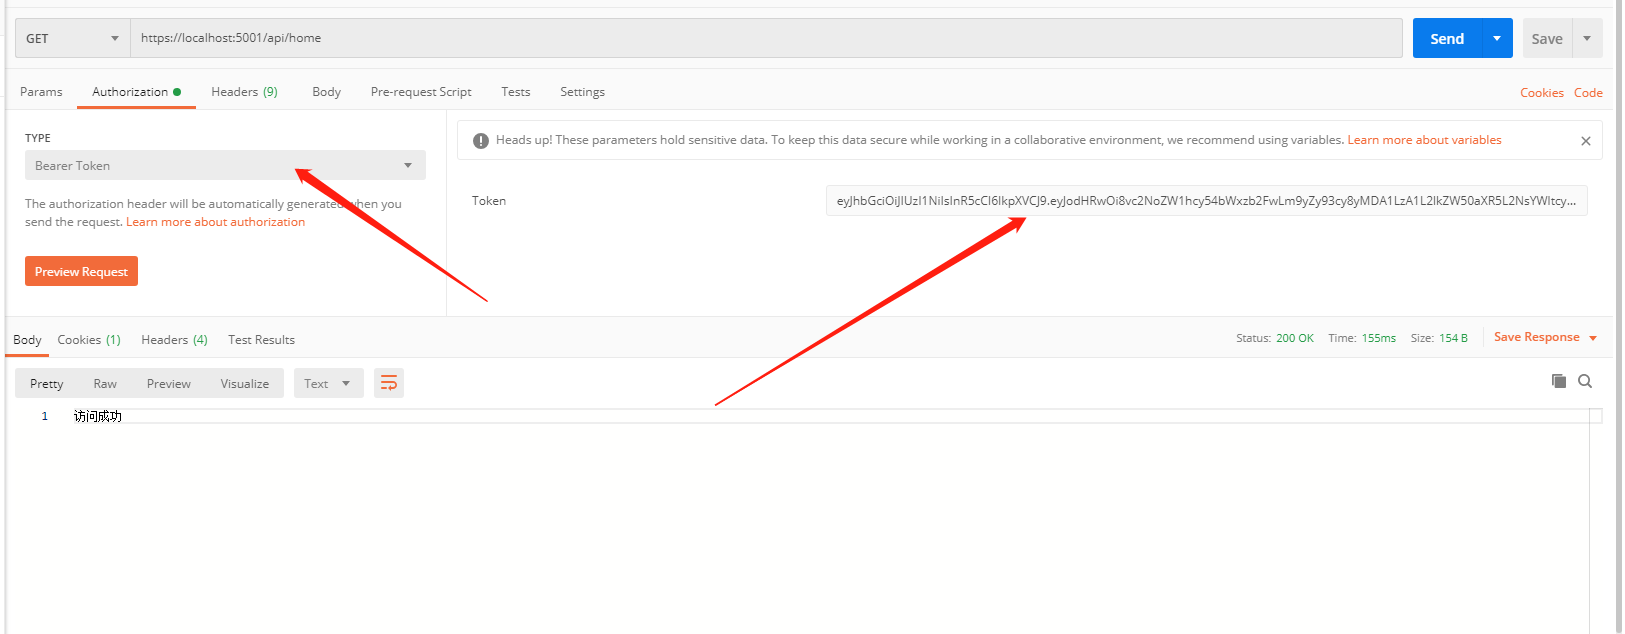
Copy the generated Token from the console and paste it into Postman. Upon reaccessing, the response status code is 200, and the response is successful.
That's roughly how JWT authentication works in ASP.NET Core.
So, how is this implemented internally in ASP.NET Core? What features and pitfalls are there? Read on below~
2. Exploring Authorization and Authentication Middleware
In the operations above, we configured two middleware in the pipeline:
            app.UseAuthentication();
            app.UseAuthorization();
The role of app.UseAuthentication(); is to read the identity from the client (Cookie, Token, etc.) as configured in ASP.NET Core and parse it, storing it in context.User.
The role of app.UseAuthorization(); is to determine whether the current access Endpoint (Controller or Action) uses [Authorize] and has configured roles or policies, and then verifies whether the Cookie or Token is valid.
Using the attribute to set relevant access requires authentication generally has the following situations:
    // No attributes applied, can be accessed directly
    public class AController : ControllerBase
    {
        public string Get() { return "666"; }
    }

    /// <summary>
    /// The entire controller requires authorization to access
    /// </summary>
    [Authorize]
    public class BController : ControllerBase
    {
        public string Get() { return "666"; }
    }

    public class CController : ControllerBase
    {
        // Only Get requires authorization
        [Authorize]
        public string Get() { return "666"; }
        public string GetB() { return "666"; }
    }

    /// <summary>
    /// The entire controller requires authorization, but Get does not
    /// </summary>
    [Authorize]
    public class DController : ControllerBase
    {
        [AllowAnonymous]
        public string Get() { return "666"; }
    }
2.1 Implementing Token Parsing
As for the source code of app.UseAuthentication(); and app.UseAuthorization(); in ASP.NET Core, it's implemented in a verbose manner across various projects. To understand the roles of these two middleware, let's manually implement their functions.
The parsed Token is a ClaimsPrincipal object that can be assigned to context.User, allowing the API to use the User instance to retrieve user information.
In the middleware, you can retrieve and parse the Token from client requests using the following code:
context.RequestServices.GetRequiredService<IAuthenticationService>().AuthenticateAsync(context, JwtBearerDefaults.AuthenticationScheme);
So, how can we manually parse it from the raw Http request? Let's break down the steps slowly.
First, create a file named TestMiddleware to act as middleware.
    public class TestMiddleware
    {
        private readonly RequestDelegate _next;
        jwtSecurityTokenHandler = new JwtSecurityTokenHandler();
        public TestMiddleware(RequestDelegate next)
        {
            _next = next;
        }
        public async Task Invoke(HttpContext context)
        {
            if (context == null)
            {
                throw new ArgumentNullException(nameof(context));
            }

            // Area to write your code


            // Area to write your code
            await _next(context);
        }
    }
2.1.1 Retrieve the Token from Http
The following code can be used to retrieve the Token from the header in the http request.
Of course, the client might not carry the Token, and the result might be null, so it's wise to add a check.
Insert the following code where indicated:
string tokenStr = context.Request.Headers["Authorization"].ToString();
The Authorization key in the Header is a string composed of Bearer {Token}.
2.1.2 Check if the Token is Valid
After obtaining the Token, you also need to check whether this Token is valid.
Since the Authorization is composed of Bearer {Token}, we need to remove the prefix Bearer to obtain the actual Token.
        /// <summary>
        /// Checks if the Token conforms to the standard JSON Web token requirements
        /// </summary>
        /// <param name="tokenStr"></param>
        /// <returns></returns>
        public bool IsCanReadToken(ref string tokenStr)
        {
            if (string.IsNullOrWhiteSpace(tokenStr) || tokenStr.Length < 7)
                return false;
            if (!tokenStr.Substring(0, 6).Equals(Microsoft.AspNetCore.Authentication.JwtBearer.JwtBearerDefaults.AuthenticationScheme))
                return false;
            tokenStr = tokenStr.Substring(7);
            bool isCan = jwtSecurityTokenHandler.CanReadToken(tokenStr);

            return isCan;
        }
After obtaining the Token, use JwtSecurityTokenHandler.CanReadToken(tokenStr); to check if the Token meets the protocol's specifications.
Add the following check where indicated:
            if (!IsCanReadToken(ref tokenStr))
                return ;
2.1.3 Parse the Token
The following code can transform the contents of the Authorization Header into a JwtSecurityToken object.
(There are many ways to substring; you can choose whichever you like...)
        /// <summary>
        /// Decrypts the Token to get the JwtSecurityToken, JwtSecurityToken: SecurityToken
        /// </summary>
        /// <param name="tokenStr"></param>
        /// <returns></returns>
        public JwtSecurityToken GetJwtSecurityToken(string tokenStr)
        {
            var jwt = jwtSecurityTokenHandler.ReadJwtToken(tokenStr);
            return jwt;
        }
However, GetJwtSecurityToken isn't what we are focused on; we need to extract Claims.
JwtSecurityToken.Claims
Insert the following code where indicated:
            JwtSecurityToken jst = GetJwtSecurityToken(tokenStr);
            IEnumerable<Claim> claims = jst.Claims;
2.1.4 Generate context.User
context.User is of type ClaimsPrincipal, and we generate ClaimsPrincipal through the parsed Claims.
            JwtSecurityToken jst = GetJwtSecurityToken(tokenStr);
            IEnumerable<Claim> claims = jst.Claims;

            List<ClaimsIdentity> ci = new List<ClaimsIdentity>() { new ClaimsIdentity(claims) };
            context.User = new ClaimsPrincipal(ci);
最终的代码块是这样的
            // 我们写代码的区域
            string tokenStr = context.Request.Headers["Authorization"].ToString();
            string requestUrl = context.Request.Path.Value;
            if (!IsCanReadToken(ref tokenStr))
                return;
            JwtSecurityToken jst = GetJwtSecurityToken(tokenStr);
            IEnumerable<Claim> claims = jst.Claims;
            List<ClaimsIdentity> ci = new List<ClaimsIdentity>() { new ClaimsIdentity(claims) };

            context.User = new ClaimsPrincipal(ci);
            var x = new ClaimsPrincipal(ci);
            // 我们写代码的区域
2.2 实现校验认证
app.UseAuthentication(); 的大概实现过程已经做出了说明,现在我们来继续实现 app.UseAuthorization(); 中的功能。
继续使用上面的中间件,在原代码块区域添加新的区域。
            // 我们写代码的区域

            // 我们写的代码块 2
2.2.1 Endpoint
Endpoint 标识了一个 http 请求所访问的路由信息和 Controller 、Action 及其特性等信息。
[Authorize] 特性继承了 IAuthorizeData。[AllowAnonymous] 特性继承了 IAllowAnonymous。
以下代码可以获取所访问的节点信息。
var endpoint = context.GetEndpoint();
那么如何判断所访问的 Controller 和 Action 是否使用了认证相关的特性?
var authorizeData = endpoint?.Metadata.GetOrderedMetadata<IAuthorizeData>() ?? Array.Empty<IAuthorizeData>();
Metadata 是一个 ASP.NET Core 实现的集合对象,GetOrderedMetadata<T> 可以找出需要的特性信息。
这个集合不会区分是 Controller 还是 Action 的 [Authorize] 特性。
那么判断是否有 [AllowAnonymous] 特性,可以这样使用。
            if (endpoint?.Metadata.GetMetadata<IAllowAnonymous>() != null)
            {
                await _next(context);
                return;
            }

文章评论