内容纲要
一,创建阿里云 IOT 产品、设备
目前阿里云每月赠送 100 万条流量,可以免费使用基础版、高级版,开通后即可免费使用。
阿里云 IOT 平台地址 https://iot.console.aliyun.com/product
登陆开通后,新建测试产品、设备。
创建产品
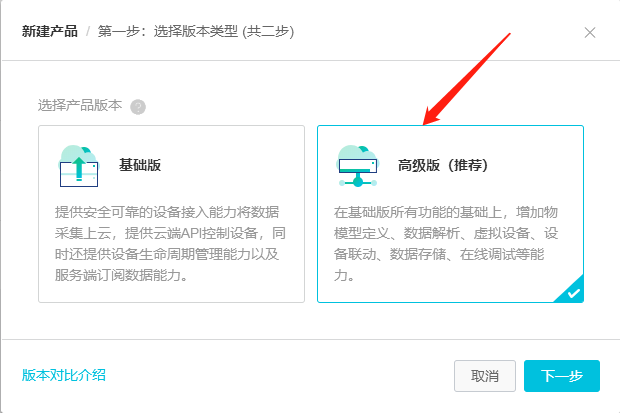
产品的定义是,一类硬件、功能、外形完全相同的设备。所以,添加一个产品后,我们就可以在此类别下添加成千上万个设备。
下面的信息要选、设备、非网关,原因后面说。
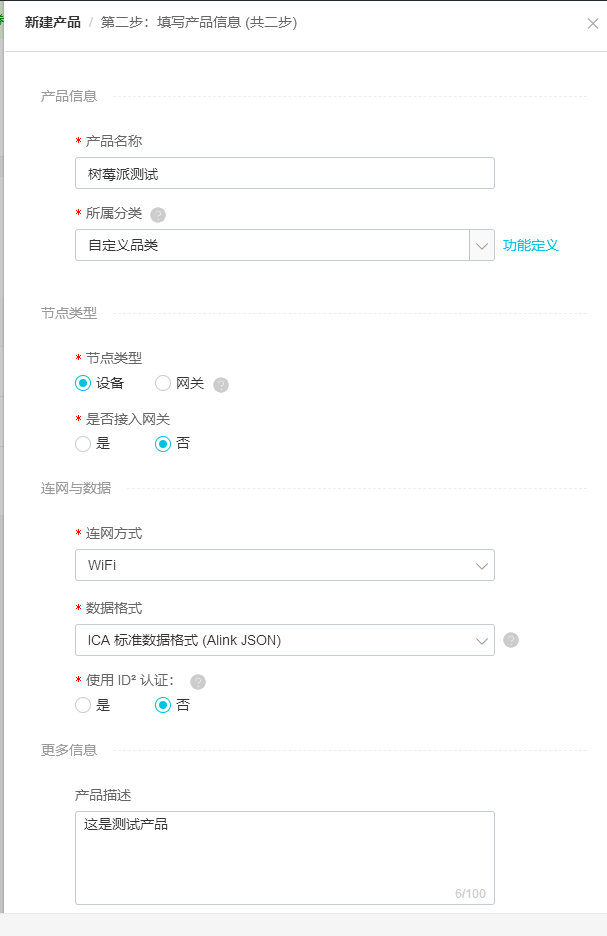
设定一个产品
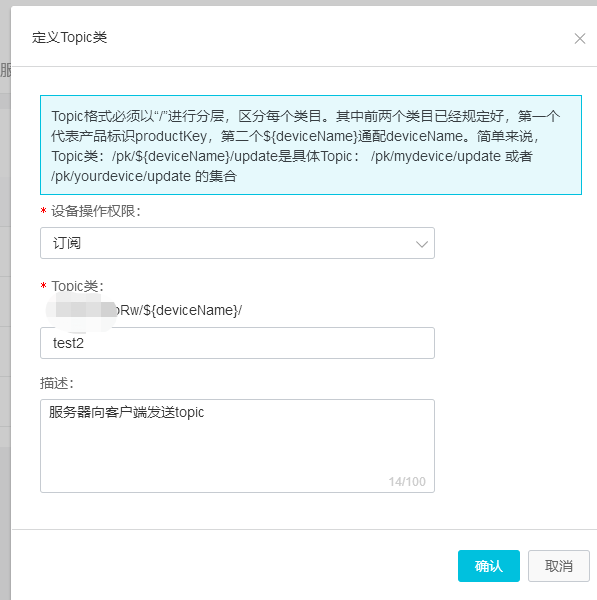
创建一个产品后,就需要设定这个产品的特征,它有那些功能?它可以进行什么样的通讯?
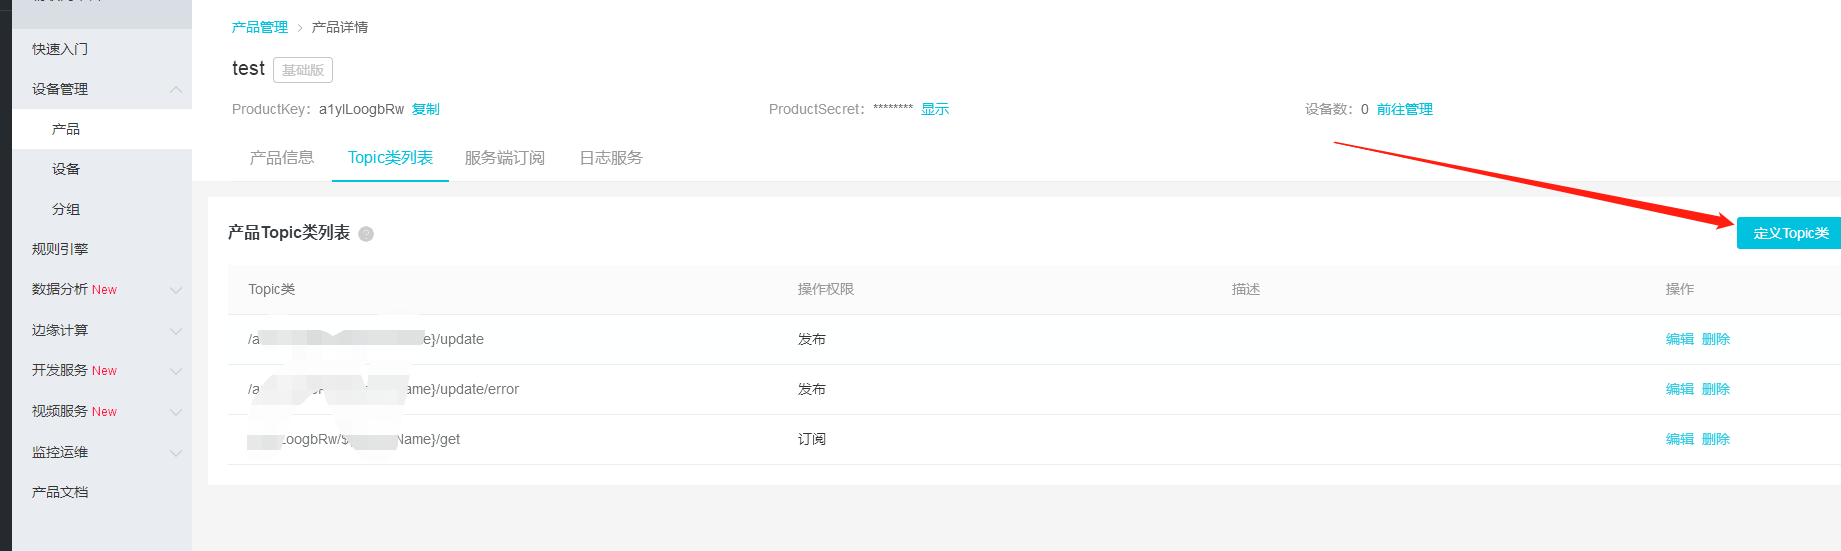
定义两个topic,一个发布、一个订阅
名称为test1、test2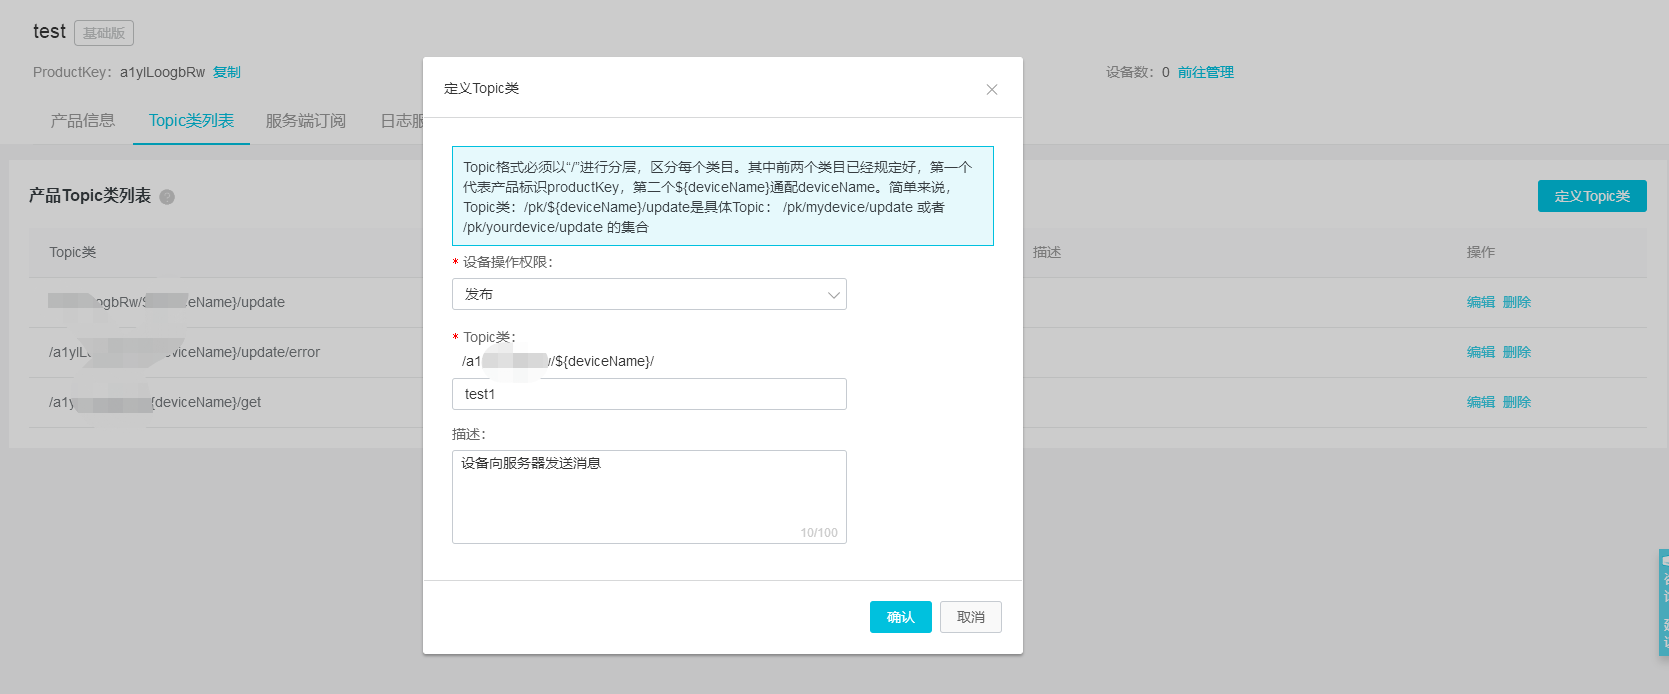
添加一个设备,记下你设备的那些设备名等信息

二,下载SDK、创建项目
SDK 下载 地址 https://iot-demos.oss-cn-shanghai.aliyuncs.com/h2/iotx-as-http2-net-sdk.dll?spm=a2c4g.11186623.2.10.57e64c07SGupEH&file=iotx-as-http2-net-sdk.dll
新建一个 .NET Frameork4 控制台项目,名称 AlyIotIest
添加引用,把下载的 dll 添加进去
新建一个类 BackMessage.cs
把以下代码复制进 BackMessage(清空以前的代码),先不用管为什么
using iotxashttp2netsdk.iot.auth.common;
using iotxashttp2netsdk.iot.callback;
using System;
using System.Collections.Generic;
using System.Text;

namespace AlyIotIest
{
    public class 默认回调 : IHttp2MessageCallback
    {
        public ConsumeAction Consume(Http2ConsumeMessage http2ConsumeMessage)
        {

            Console.WriteLine("默认回调");
            Console.WriteLine(http2ConsumeMessage.MessageId);
            if (http2ConsumeMessage.Payload.Length != 0)
            {
                Console.WriteLine("收到平台消息:");

                string a = Encoding.ASCII.GetString(http2ConsumeMessage.Payload);

                Console.WriteLine(a);
            }

            return ConsumeAction.CommitSuccess;
        }
    }
    public class 自定义回调 : IHttp2MessageCallback
    {
        public ConsumeAction Consume(Http2ConsumeMessage http2ConsumeMessage)
        {

            Console.WriteLine("自定义回调 ");
            Console.WriteLine(http2ConsumeMessage.MessageId);
            if (http2ConsumeMessage.Payload.Length != 0)
            {
                Console.WriteLine("收到平台消息:");

                string a = Encoding.ASCII.GetString(http2ConsumeMessage.Payload);

                Console.WriteLine(a);
            }
            return ConsumeAction.CommitSuccess;
        }
    }
}
三,开始操作、准备工作
1,Program.cs 需要用到以下命名空间
using System;
using iotxashttp2netsdk.iot.auth.common;
using iotxashttp2netsdk.iot.message;
using System.Net;
using System.Linq;
using System.Text;
2,设定一个设备客户端对象
复制 static MessageClient client; 到Program类钟
    class Program
    {
        //  步骤 1 定义设备客户端 #
        static MessageClient client;

...
...
}
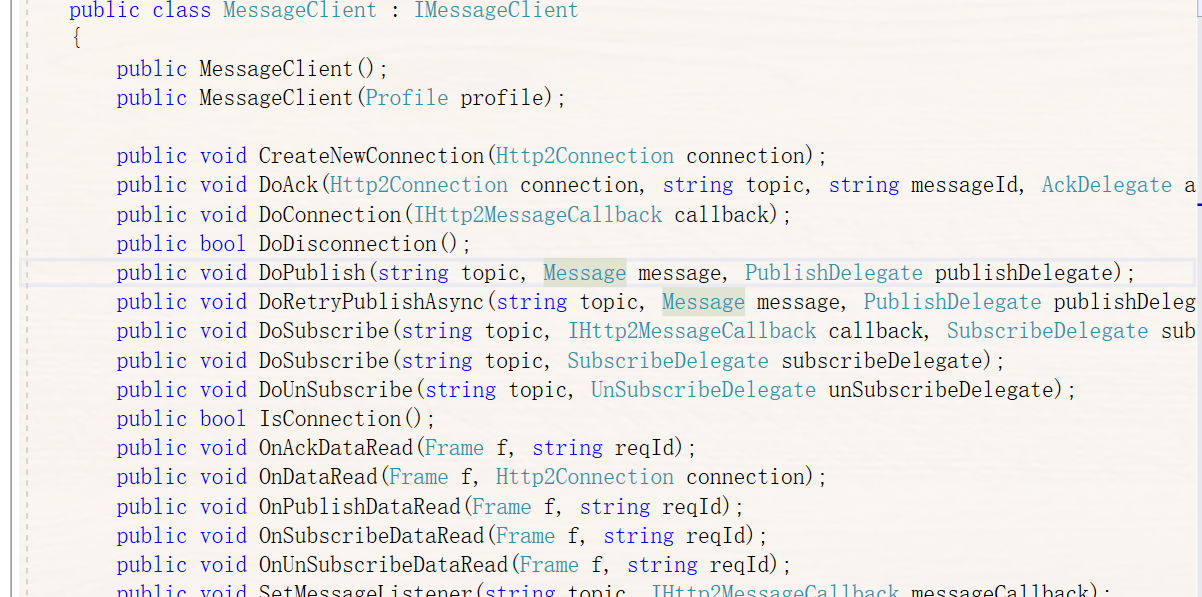
MessageClient 是核心,用于连接服务器、通讯、订阅和发布Topic、触发任务,先不管他
四,开始写代码
在 Main 方法中写代码
步骤 2,添加密钥信息,在相应位置填上你的密钥
       // 步骤 2 从控制台获取 productKey、deviceName、deviceSecret 信息 #
            // 到阿里云IOT物联网后台设置产品、添加设备后,可以找到
            string productKey = "   ";
            string deviceName = "   i";
            string deviceSecret = "   ";
步骤 3
 // 步骤 3 标记 设定设备唯一识别符 clientid
            // 阿里云官方给的例子是 子网IP
            IPHostEntry host = Dns.GetHostEntry(Dns.GetHostName());
            // 客户端设备唯一标记
            string clientId = host.AddressList.FirstOrDefault(
                ip => ip.AddressFamily == System.Net.Sockets.AddressFamily.InterNetwork).ToString();
// 地域可用区 ,根据实际修改
            string regionId = "cn-shanghai";
            string domain = ".aliyuncs.com";
            string endpoint = "https://" + productKey + ".iot-as-http2." + regionId + domain;
步骤 4
            //设置配置服务和构建客户端
            //连接服务配置项
            Profile profile = new Profile();
            profile.ProductKey = productKey;
            profile.DeviceName = deviceName;
            profile.DeviceSecret = deviceSecret;
            profile.Url = endpoint;
            profile.ClientId = clientId;
            //删除堆积消息
            profile.CleanSession = true;
            //qos>0消息,SDK发生异常时可以设置重,重试次数最大为3次
            profile.RetryPubCount = 3;
            //重试间隔时间单位为s(秒)
            profile.RetryIntervalTime = 2;
            profile.GetDeviceAuthParams();

            //构造客户端
            client = new MessageClient(profile);
步骤 5
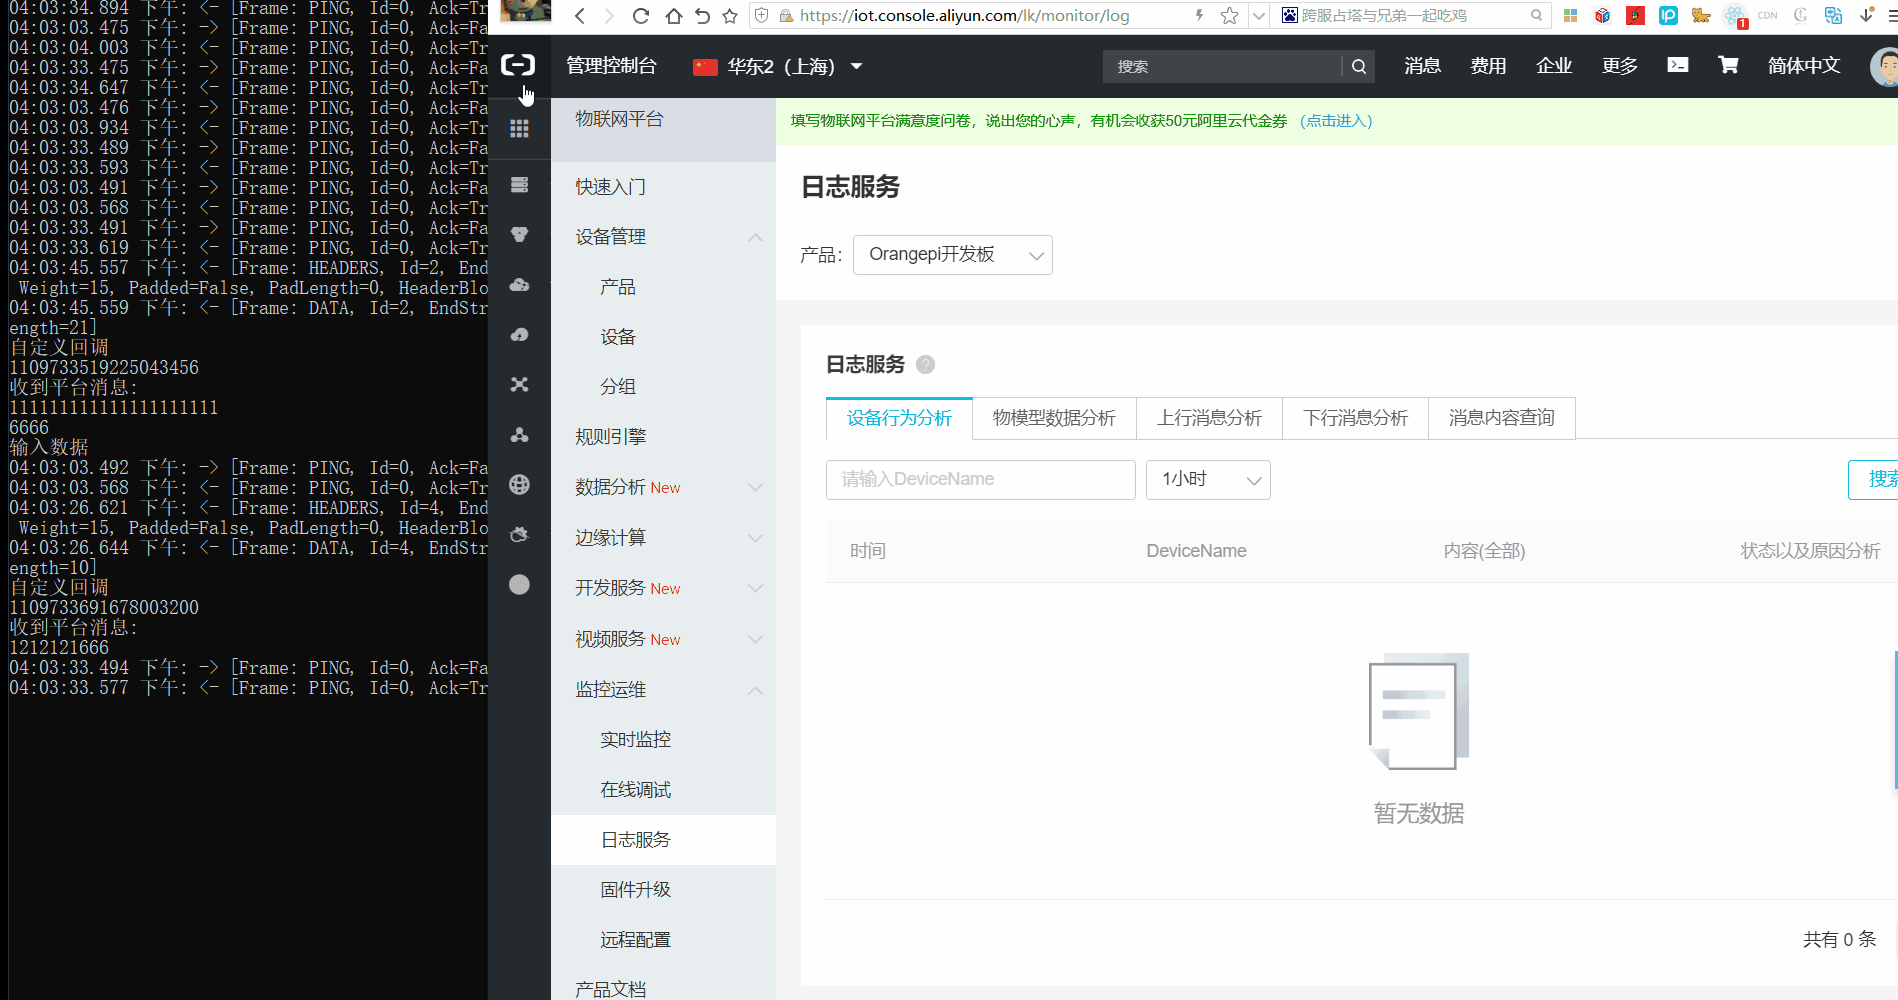
         // 设置订阅和发布的 topic
            string topic = "/" + productKey + "/" + deviceName + "/user/test1";
            string topic2 = "/" + productKey + "/" + deviceName + "/user/test2";
            // 接收数据,刚连接时
            // 只生效一次
            // 默认回调
            client.DoConnection(new 默认回调());

            //回调
            // 自定义一个 IHttp2MessageCallback,每次收到消息都用此回调
            client.SetMessageListener(topic2,new 自定义回调());

            client.DoSubscribe((string)topic ,msg=> {

                Console.WriteLine ("订阅服务端消息");
                Console.WriteLine("msg.Code" + msg.Code);
                Console.WriteLine("topic:" + msg.Message.Topic);
                Console.WriteLine("msg.Message");
                Console.WriteLine("body: " + Encoding.ASCII.GetString(msg.Body));
                Console.WriteLine(msg.Message.MessageId);
            });
            client.DoSubscribe((string)topic2, msg=>
            {
                Console.WriteLine("订阅服务端消息");
                Console.WriteLine("msg.Code" + msg.Code);
                Console.WriteLine("topic:" + msg.Message.Topic);
                Console.WriteLine("msg.Message");
                Console.WriteLine("body: " + Encoding.ASCII.GetString(msg.Body));
                Console.WriteLine(msg.Message.MessageId);
            });
步骤 6
添加一个方法
public static void 发数据(string topic,string str)
        {
            //发消息
            Message message = new Message();
            message.Payload = Encoding.ASCII.GetBytes(str);
            message.Qos = 1;
            client.DoPublish(topic, message, msg =>
            {
                Console.WriteLine("publish topic message, messageId: " + msg.Message.MessageId
                                  + "|| topic:" + msg.Message.Topic
                                  + "|| code: " + msg.Code
                                  + "|| body: " + Encoding.ASCII.GetString(msg.Body));
            });
        }
在 Main 方法内,后面加上
            while (true)
            {
                Console.WriteLine("输入数据");
                string str = Console.ReadLine();
                if (str.ToUpper() == "EXIT")
                {
                    break;
                }
                发数据("/" + productKey + "/" + deviceName +"/user/test1", str);
            }

            Console.ReadKey();
运行你的项目
五,运行测试

文章评论